

Overview
The quintessential home lab. A place you can test, explore, and sharpen your skillset as an IT Guru or even just a beginner. We will cover some of the details, services, and roll out that might help you create your own Homelab.
For starters, this is not going to be a comprehensive how-to. I will talk about unique integrations I’ve learned about in my efforts to build my own homelab. One of the first points is that a good home lab has a fair amount of control over the incoming internet, and ideally, you’ve been able to setup a DMZ or something else to hold the sensitive elements. In getting there, you will have to likely setup the network to be able to handle a DMZ in the first place.
The Router
In this guide we will use the OPNSense router which is a great open source project that branched from the PfSense router that has existed with a lot of support for some time. PfSense was bought, so, it is a good thing that we have a guaranteed Open Source project that should continue to live.
Specific Integration Points
DNS, Internal DNS, and Client DNS Registration
The OPNSense has the ability to do the DHCP Server for IPv4 addresses, and you should likely be using this. It is very effective and configurable.
For this detail however, you will want to more or less configure your OPNSense to resolve all things from your internal stack, and now we get to your internal stack.
Say you deploy a BIND DNS Server to be your Nameserver. You can do this and deploy a DNS Key and use that key from the OPNSense to register DHCP clients into your local domain Zone.
For this configuration, we will not be having the BIND server do all the work, in fact, it will only serve the local domain and that is it (or any other extra domains/IPs we register there). We will use a Pihole to sanitize our domain usage for all devices. Fortunately, now the Pihole lets us configure a local DNS server to query for local domains (in case it is not the DHCP Server for your network). This works perfectly for what we are trying to do.
We can configure the Pihole to be THE DNS Server for the network, set the BIND nameserver to run for the local domain, and then configure the OPNSense to update BIND for the local domain. Full DNS resolution!
BIND:
In “/etc/bind/named.conf”:
key nameofkey {
	algorithm hmac-md5;
	secret "Base64encodedValue==";
	};

server 192.168.1.1 {
	keys {
		nameofkey;
		};
	};
This allows BIND to authenticate the OPNSense router.
In your main local domain zone:
...
	update-policy {
 		grant nameofkey wildcard *.localdomain.tld. A TXT;
 		};
...
In your main local reverse lookup zone:
...
	update-policy {
 		grant nameofkey wildcard *.1.168.192.in-addr.arpa. PTR;
 		};
...
In your OPNSense DHCPv4 Service config:
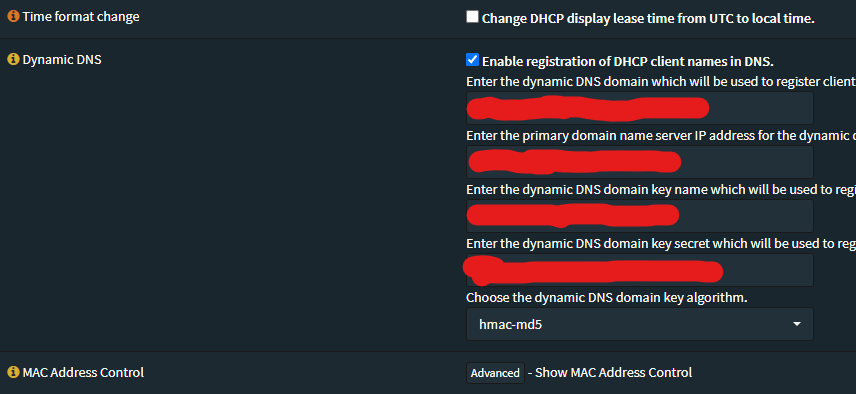
You will enter you local domain name in a “localdomain.tld” format, without the quotes.
Enter the IPv4 address of your BIND nameserver.
Enter the key, above referenced as “nameofkey”, without the quotes.
Enter the secret, above referenced as “Base64encodedValue==”, without the quotes.
Leave the domain key algorithm as “hmac-md5” because neither system support an alternative and this is better than blindly trusted the IP address for source auth.
That’s it! Obviously I’m not telling you how to setup a BIND server at the beginning, or going over configuring the Pihole to query your localdomain. Future updates… <3
Future Updates:
You might not be able to apply state, restart the BIND service from Webmin until you change how that instruction is sent, which if in Webmin, you go to BIND, then click the gear in the upper left-ish area, and in the “Configuration category” drop down you select “System configuration”, then change the “Command to stop BIND” to ‘just kill process’, and then “Command to apply BIND configuration” to ‘Just send HUP signal’
If you ran into this error: “NDC command failed : rndc: 'thaw' failed: out of range” here’s what to do, get into the CLI for your BIND container, and issue this command:rndc sync -clean
Then you apply-state (restart) your container, should be good to go! What happened is a freeze/thaw moment got caught in the middle and after a restart the cache files are invalidated, it does mean you effectively loose those changes whatever they were, but, for most of us that won’t matter as we have DHCP recording/issuing those changes.